
Creating a Windows Phone 8 app with PhoneGap Build
May 10, 2014 · Comments PhoneGapCordovaLike many, I began with an iOS and Android version of my PhoneGap app. As of April 2014, adding the third option, Windows Phone 8, lacks complete documentation (PhoneGap Build) or is confusing because of too much documentation (Microsoft!). Once you figure out what to do, it’s actually quite easy. Follow my minimal guide to get your app configured for PhoneGap Build and deployed to a Windows Phone 8 device.
PhoneGap Build:
The config.xml file needs to be updated to include Windows Phone 8:
1. Add a reference to the platform: <gap:platform name=“winphone” />
2. Add icons:
<icon src=“icon.png” gap:platform=“winphone” />
<icon src=“tileicon.png” gap:platform=“winphone” gap:role=“background” />
Note that the second element, Tile Icon, is unique to Windows Phone. Read more here. In my tests, I first created a WP 8 version without these icon elements. The default root icon (<icon src=“icon.png” />) was used as both the main icon and the tile icon. I created a 512x512 tile icon that looks great and used my default icon (also 512x512) for the main one.
3. Add a splash screen:
<gap:splash src=“splash/winphone/splash.jpg” gap:platform=“winphone” />
PhoneGap Build only supports one splash screen currently, in jpg format (Android/iOS are png). Also, as mentioned here, “If you’re using a single image, you should add an image file that is 768 × 1,280…. The phone automatically scales the image to the correct size.” As is typical for app development, this size is unique to Windows Phone - iOS and Android have different size requirements. That’s ok - I simply took my highest quality iPad portrait splash screen (1536x2008) and sized it down to 768 x 1280.
4. (Updated 3/2016) Add the publisher Id:
Once you’ve created a WP developer account (below), you can access the publisher Id to attach to the app. You find it in the Account Details section:

Copy the “Windows Phone publisher ID” GUID value that appears above, choose “Add a publisher id…” option from PhoneGap Build and copy it in.
Windows Phone 8:
This takes about an hour assuming you have the steps above completed first.
1. Register as a WP developer here. Referencing the developer dashboard’s Account Summary, be sure to set up your Contact Info, Tax Profile, and Payment Account. These are similar to the other app stores so this shouldn’t take you very long.
1. Download and install the Windows Phone SDK 8.0 from this page. This task took the most time, at about 30 minutes or so. It’s a large download which is unfortunate for PhoneGap users, but we need the tools referenced below in order to test on devices.
2. Install your app on a device. There are many ways to do so, including from Visual Studio, the command line, or an Application Deployment tool bundled with the WP SDK. The easiest for me as a PG Build user was the Application Deployment tool. Making sure that your phone is connected to your computer, set the Target to “Device” and select your app XAP file:
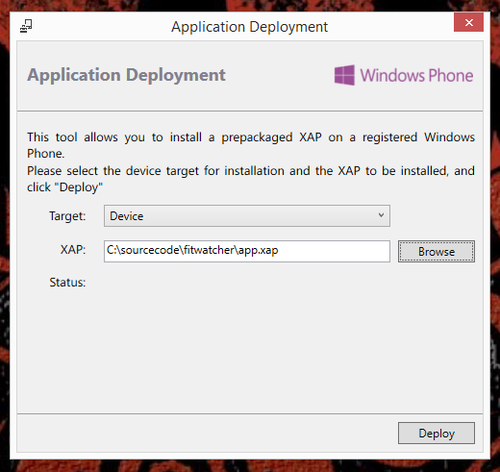
Now, click the Deploy button. The app is pushed immediately to your device. All set! If you make changes to the app and create a new build, simply use “Deploy” again - the app will be overwritten with the latest version - no need to remove it first on the device.
3. Unfortunately, as I noticed with my app, you most likely won’t be able to publish to the store right away because of UI sizing issues. This is due to the fact that Windows Phone 8 uses Internet Explorer 10 as the web browser behind PhoneGap (see other notes here from the PhoneGap team) versus WebKit that iOS and Android use. Tweak the UI as necessary, check that any plugins you use are compatible with Windows Phone 8 (I recommend moving to the official PhoneGap plugins if possible as those are more likely to support all three platforms), then you should be all set.
I’m still enhancing the UI of my app for WP8, but I will update this post with tips for that as well should I encounter any.